If you own a LiftMaster garage door opener, you’re likely familiar with its convenience.
Nonetheless, many users need help in programming or resetting the remote control.
Whether it’s your first time attempting Liftmaster remote programming or looking for a Liftmaster remote reset, this comprehensive guide will walk you through the entire process.
Essential Tools to Program Liftmaster Garage Door Opener
Before diving into the LiftMaster garage door opener programming steps, ensure you have the necessary tools at hand:
- A stable ladder to reach the motor unit.
- Your LiftMaster remote control.
- Fresh batteries for the remote controls.
- A piece of paper and pen for jotting down any reset codes.
![]()
TIP: Replace the batteries with only a 3V CR2032 coin cell battery.
How to Program Liftmaster Garage Door Opener
Follow this straightforward process to program Liftmaster remote:
Step 1: Unlock the Panel on Your Garage Door Opener
Locate the panel covering the motor unit of your garage door opener. You’ll need to access this for the subsequent steps.
- Locate the access panel; some LiftMaster models feature panels on their side, whereas others position them at the rear.
- Once located, open the panel to reveal the inner workings and motor unit.
Expert Tip: Close the garage door securely before you start the programming process. The reason for this precaution will become clear shortly.
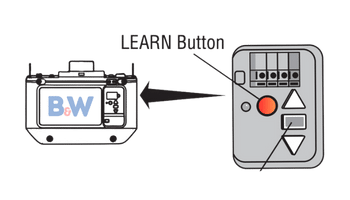
Step 2: Identify the LEARN Button on the Motor Unit
Once you’ve opened the panel, find the LEARN button.
This button is essential for initiating the programming sequence.
A control panel and accompanying light bulb are in the motor unit.
- On the control panel, identify a tiny circular or square button labeled depending on the specific model; this button might be colored red-orange, yellow, green, or purple, mirroring the hue of its corresponding wire. For instance, if your setup utilizes a yellow wire, you’ll find the LEARN button in a matching yellow shade.
- Additionally, take note of the compact LED indicator light adjacent to the button. This indicator shares the same color scheme as the wire and the button.
Step 3: Activate the Remote Control’s Program Function
When it comes to how to reset Liftmaster remote, you can find a series of buttons. Press and hold the button you wish to program until the LED light on the motor unit blinks. Another note is that the program button varies across different models.
- For those with an 890MAX or 895MAX model, locate the small hole on the backside of your remote. Insert a pin into this hole and push inward to activate the side light on the controller.
- If you’re using the 893MAX, detach the visor clip and use it to press into the rear hole of the remote until the indicator light illuminates.
- If you have a remote without keys, simultaneously hold down the “*” and “#” buttons for remotes until the light indicator activates.
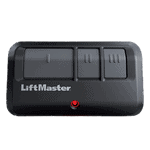
Important: LiftMaster MAX remote controllers feature three distinct buttons, each requiring individual programming.
Step 4: Press the Button on Your Remote to Initiate Programming
To answer the question of how to reset Liftmaster, we still recommend consulting your Liftmaster manual to determine the specific number of button presses required for your setup.
The frequency of button presses corresponds to the color of the “LEARN” button on your garage door opener:
- Single press for a yellow “LEARN” button
- Double press for a green “LEARN” button
- Triple press for an orange-red “LEARN” button
- Quadruple press for a purple “LEARN” button
Step 5: Complete the Programming for Your Selected Button
- Once you’ve pressed the designated button the specified number of times, proceed by pressing either of the two remaining buttons on your remote.
- Next, give a single press to the “LEARN” button on your garage door opener to illuminate its LED indicator.
- Within a 30-second window following the previous action, press the specific button on your remote that you wish to program. The flashing LED light and an audible click will confirm successful programming.
Expert Tip: Exercise caution not to hold down the “LEARN” button for an extended period, as this action will erase Liftmaster remotes paired with your remote.
Step 6: Verify the Functionality of Your Remote Control
Test the remote by pressing the programmed button.
You’ve completed the LiftMaster remote programming if the garage door responds correctly.
Expert Tip: Before doing a Liftmaster reset remote action, there are a few things to consider to simplify the process.
Precautionary Checks Before Initiating a Liftmaster Reset Code
Before resetting Liftmaster garage door opener, it helps to follow these steps first:
- Battery Replacement: Opt for high-quality batteries to minimize frequent replacements and ensure optimal performance.
- Address Corrosion: If you notice rust or discoloration on the battery terminals, clean them with a cloth and gently use sandpaper to eliminate any corrosion.
- Lens Maintenance: Regularly cleaning the lens is essential for the seamless operation of your garage door opener. Accumulated dust can obstruct the signal transmission, affecting the door’s functionality.
If your remote functions correctly post-reprogramming but fails to operate the garage doors, the issue might be rooted in the opener.
In such instances, disconnect the opener, access the battery compartment, and swap out the batteries to potentially resolve the issue.
Elevate Your Garage Door Experience with B&W Garage Doors
This guide aims to simplify the often daunting process of LiftMaster garage door opener programming.
By following these steps and tips, you’ll be well-equipped to tackle any programming challenges and enjoy the full benefits of your LiftMaster opener.
Are you ready to enhance the functionality and security of your garage? At B&W Garage Doors, we offer a wide range of LiftMaster products and expert guidance to ensure seamless operation.
Contact us today to discover how we can transform your garage door experience!